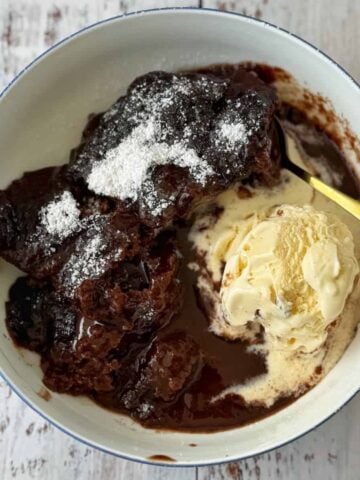
Chocolate ice cream mixed with marshmallow Easter eggs sitting on top of a chocolate cake, then covered with silky meringue and baked in the oven until golden brown. A retro, yet impressive dessert to serve at a dinner party.

Bringing back an 80's classic with this recipe for Chocolate Baked Alaska. This show-stopping dessert has been given an Easter twist and is actually much easier to make than you might think!
When making this dessert, just make sure you have plenty of time to prep and freeze the ice cream solid before you bake it. I recommend doing this a day or two before you want to eat it to avoid any mishaps! I love breaking down intimidating dessert recipes to make them achievable. Check out my easy Lemon Meringue Pie, Sticky Date Puddings and Chocolate Mousse Cake.
Jump to:
Ingredient notes:

- Marshmallow eggs: These are a fun addition to use at easter, however if you can't find them you can replace them with regular marshmallows or just leave them out. Other filling ideas are nuts, frozen berries, chocolate chips or your favourite sauce stirred through your ice cream. Just remember that whatever you add will be frozen solid. If you use lollies or gummy candy they will turn rock solid and be tricky to slice and chew.
- Chocolate ice cream: Again we went all out chocolate for this rich recipe, as an easter treat. But this recipe is super versatile, feel free to make it your own and use your favourite flavour of ice cream and cake too.
- White vinegar/lemon juice: This helps to stabilise the meringue so it whips up to maximum fluffiness. You can also use 1 tsp of cream of tartar instead if you have it.
Note: Scroll to the recipe card for the ingredients, quantities and the full method.
Step by step instructions:
Remove the ice cream from the freezer to soften, then chop the marshmallow eggs into pieces. Line a bowl with cling film, ensuring you leave excess cling film hanging over the edge to wrap the base up at the end.
Scoop the softened ice cream into the lined bowl adding pieces of marshmallow eggs as you go, until both have been distributed evenly throughout. Push the ice cream mix down with a spoon to ensure all the air is removed.


Place the store-bought cake on top of the ice cream and push down firmly. If there are any gaps around the edge make sure to fill them with cake to fully seal, then wrap tightly and freeze until solid (at least 5 hours, preferably overnight).


Line a small tray with baking paper. Take the ice cream bowl from the freezer, then run hot water onto the outside of the bowl. Place the ice cream bowl upside down on the lined tray, then lift the bowl off the ice cream. Remove the cling film, then place the tray with the uncovered ice cream back in the freezer.


Separate the egg whites being very careful not to get any yolk in the mix. Add the whites to a stand mixer with the vinegar (or lemon juice) and whisk until soft peaks form. Keep the mixer going on high while you slowly add the caster sugar, 1 tablespoon at a time. Keep mixing until you have stiff peaks.


Remove the ice cream from the freezer, then smother it with the meringue mixture. Make sure to seal it fully at the bottom edge, then use the back of a spoon to create a pattern you like. Return to the freezer for 2 more hours or overnight.


When ready to serve, preheat the oven to 220°C fan bake. When it's up to temperature, bake for 5 minutes or until golden brown. (You could use a blow torch instead of the oven to toast the outside).


Remove from the oven and transfer to a serving plate using a few spatulas. Serve immediately.

Recipe FAQs:
Amazingly no! That's thanks to the thick layer of meringue and the frozen cake base which insulates the cold and stops the heat getting in. However it's important your ice cream is fully frozen and the oven is super hot so it toasts the outside quickly before the heat can make its way into the centre. It's also important that you have a good seal, with only cake and meringue on the outside - any gaps and you'll spring a leak.
Yes that's fine to use. Mine had chocolate ganache on top and I used it for an extra bit of texture and flavour. Just make sure to place the icing downward against the ice cream. If it's on the base of the tray it will melt in the oven.
Your bowl will determine the shape of your Baked Alaska. I had quite a small store-bought cake for the base so I used a deep narrow bowl (17cm across and 11cm deep). If your cake isn't the right size you can slice it in half into 2 layers and use the second layer to fill in any gaps. A bowl 20cm across would work well.

Storage:
The ice cream and cake filling could be prepared up to three days ahead of time if you like. Then make fresh meringue and freeze overnight before baking.
A baked Alaska is best served immediately and not suitable for storing in the fridge afterwards. You can freeze leftovers in an airtight container for up to three weeks. But it does taste best on the day it is baked.
Top tips:
- If you wet the bowl when you add the cling film it will stick nicely to the sides.
- Make in advance and store in the freezer days before, so when your guests are there, you can whip it out, bake and serve!
- When making your meringue, make sure not to get ANY egg yolk in your whites! Also use a clean bowl, wipe it out with a dash of vinegar or lemon juice to break down any fat residue. Fats will stop your meringue whipping up and reaching full fluffiness.
Related Recipes:


Made this recipe?
Please click on the stars below to rate it or, write a review!

Chocolate Baked Alaska
Chocolate ice cream mixed with marshmallow Easter eggs sitting on top of a chocolate cake then covered with silky meringue and baked in the oven until golden brown.
Ingredients
Chocolate filling
- 2L chocolate ice cream
- 1 packet marshmallow eggs, 150g
- 1 store-bought chocolate cake
Meringue
- 5 egg whites
- ½ tsp white vinegar or lemon juice
- 1 cup sugar
- 1 tsp vanilla essence
Instructions
- Chocolate filling: Remove your ice cream from the freezer to soften, then chop the marshmallow eggs into pieces. Line a bowl with cling film, ensuring you leave excess cling film hanging over the edge to wrap the base up at the end. (see notes for tips).
- Scoop the softened ice cream into the lined bowl adding pieces of marshmallow eggs as you go, until both have been distributed evenly throughout. Push the ice cream mix down with a spoon to ensure all the air is removed.
- Place the store-bought cake on top of the ice cream and push down firmly. If there are any gaps around the edge make sure to fill them with cake to fully seal, then wrap tightly and freeze until solid (at least 5 hours, preferably overnight).
- Line a small tray with baking paper. Take the ice cream bowl from the freezer, then run hot water onto the outside of the bowl. Place the ice cream bowl upside down on the lined tray, then lift the bowl off the ice cream. Remove the cling film, then place the tray with the uncovered ice cream back in the freezer.
- Meringue: Separate the egg whites being very careful not to get any yolk in the mix. Add the whites to a stand mixer with the vinegar (or lemon juice) and whisk until soft peaks form.
- Keep the mixer going on high while you slowly add the caster sugar, 1 tablespoon at a time. Keep mixing until you have stiff peaks.
- Remove the ice cream from the freezer, then smother it with the meringue mixture. Make sure to seal it fully at the bottom edge, then use the back of a spoon to create a pattern you like. Return to the freezer for 2 more hours or overnight.
- Bake: When ready to serve, preheat the oven to 220°C fan bake. When it’s up to temperature, bake for 5 minutes or until golden brown. (You could use a blow torch instead of the oven to toast the outside).
- Remove from the oven and transfer to a serving plate using a few spatulas. Serve immediately.
Notes
- The size and style of your bowl will determine the shape of your baked alaska. I had quite a small store bought cake for the base so I used a deep narrow bowl (17cm across and 11cm deep). If your cake isn't the right size you can slice it in half into 2 layers and use the second layer to fill in any gaps. A bowl 20cm across would work well.
Nutrition Information:
Yield: 12 Serving Size: 1Amount Per Serving: Calories: 317Total Fat: 12gSaturated Fat: 7gTrans Fat: 0gUnsaturated Fat: 5gCholesterol: 49mgSodium: 132mgCarbohydrates: 48gFiber: 1gSugar: 44gProtein: 6g
Nutritional values are approximate. Please use your own calculations if you require a special diet.
Thank you for checking out this recipe. I hope you enjoy making and eating it! If you have any questions, queries or feedback, please feel free to leave a comment below.
If you don't already follow me, head over to my Instagram, Facebook or TikTok pages to keep up to date with all my new recipes.
Vanya

JJ says
I made a small one (to serve 4 people) for a birthday cake.
I followed the instructions listed here, and froze it overnight (ice cream, fruit, cake) before adding meringue and returning to the freezer for 5 minutes rather than the full 2 hours to overnight. Oven temp at 220 fan bake , for 5 minutes.
I don’t consider it successful as the meringue started to over-brown after 3 minutes, and after 5 minutes it was removed from the oven to serve and the cake and fruit were still frozen solid.
It was very entertaining as it was difficult to cut through the frozen cake and the birthday girl has a great sense of humour.
The frozen cake was left uneaten, and the worst of the darkened meringue was removed before serving. The meringue was enjoyed so that’s good 🙂
I’m not sure what happened, I would like to attempt another but not sure what the issue was.
VJ cooks says
Hi JJ, sorry to hear that. This is a notoriously tricky recipe to get right and unfortunately so much of it comes down to the appliances you are using. If you're oven runs hot or your freezer runs cold it can impact how the recipe is cooked. So without being in your kitchen with you I can offer the following suggestions.
1) The cake layer could have been too thick, it should defrost in the oven. Around 2cm thick is plenty it’s insulate the icecream.
2) You could drop the oven temp around 20 degrees next time so the meringue browns slower. Ensure it's not on fan bake as this will also make it burn more quickly.
3) The rush to serve this dish is to ensure the ice cream doesn’t melt. You'd be better to leave it to sit for 5-10 minutes at room temp before cutting it so that the ice cream can soften a little and the cake can thaw.
Cheryl Alcorn says
I suggest chocolate fish instead of Easter eggs if they are out of season.
VJ cooks says
What a great idea! Thanks for the feedback 🙂