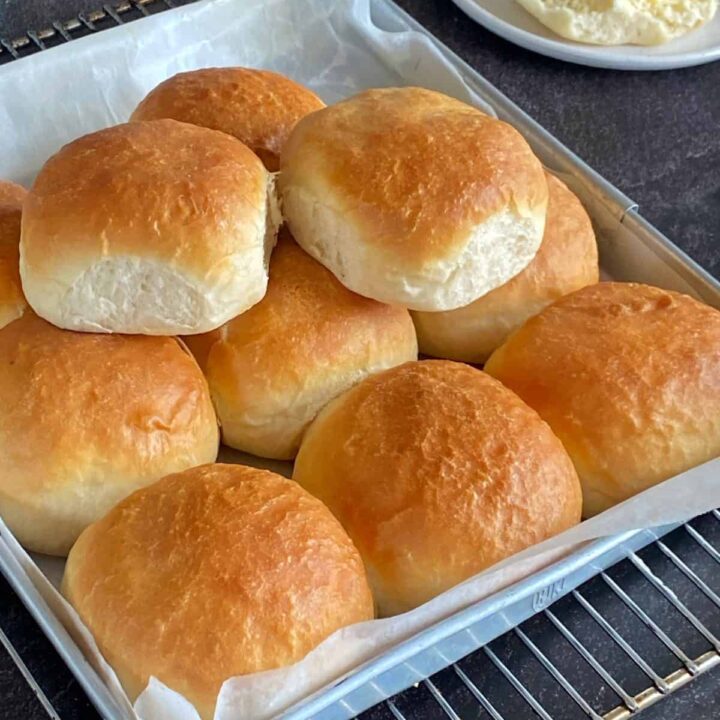
Picture-perfect, soft and fluffy dinner rolls made from pantry staples; sugar, yeast, flour, oil, salt, butter and milk. These look just like store-bought rolls!

When I first made these Dinner Rolls, I brought them into the office to show Vanya. She thought they were so perfect looking that I was playing a joke on her and had just purchased them from the supermarket! That's how awesome they are.
If you're new to bread making and feeling a little intimidated by the process, don't be. I have included so many tips and tricks below along with process shots and a thorough step-by-step guide. Make sure you read all the notes before starting and you'll be away laughing.
These dinner rolls would be perfect for making my Cheeseburger Sliders or my Pepperoni Sliders (just make the rolls half the size so you get 24 small rolls instead of 12 large rolls).
If you want to try your hand at another bread recipe, be sure to give my Homemade Bagels a go. They're also quite straightforward once you get into it.
Jump to:
Ingredient notes:

- Flour: High Grade Flour has as a higher ratio of gluten which makes your dough strong and stretchy and catches all the air bubbles to make a light fluffy bread.
- Yeast: Check your yeast, make sure it's within the expiration date. Top tip, store it in the fridge as it lasts longer. Yeast is a living thing so it grows in warm and wet conditions. Pouring boiling water on it can kill your yeast.
- Milk: I use standard milk in my bread rolls and haven't tried it with a dairy-alternative milk sorry. But you can swap it for water if you prefer.
Note: Scroll to the recipe card for the ingredients, quantities and the full method.
Step by step instructions:
In a mixing bowl, combine the milk and warm water, it should be lukewarm to the touch. Add the dried yeast and sugar, then stir and let sit for 5 minutes, or until frothy. Add the vegetable oil, salt, and flour.


Using a stand mixer with a dough hook attachment, mix for 2-3 minutes until the dough forms and pulls away from the sides of the bowl. Transfer the dough to a lightly floured surface and knead by hand for up to 5 minutes, until the dough feels smooth and springy. Shape into a tight ball.


Place the dough in a lightly oiled bowl, cover with plastic wrap, and let it rise in a warm spot for about 1 hour, or until doubled in size.


Turn the dough out onto a lightly floured surface and divide it into 12 equal portions (you can weigh the dough or eyeball it).


Shape each portion into a ball and place them on a lined baking tray, about 2 cm apart. Let the dough balls prove in a warm spot for 45 minutes. Preheat the oven to 180°C fan bake.


Bake for 15 minutes, then brush the tops with melted butter. Continue baking for an additional 3-5 minutes, or until golden brown.


Serve warm with butter.

Recipe FAQs:
Yes! You can add a few teaspoons of your favorite chopped fresh herbs to the dough. Another option is to add garlic to the butter you brush over the rolls. You can also decorate the tops. To do this, brush the rolls with a little milk after proving but just before baking, and sprinkle with poppy seeds, sesame seeds, sea salt, or cumin seeds-whatever you like. Just make sure they aren't too high in the oven, as the seeds could burn.
Make sure to knead the dough for at least 5 minutes. If the gluten is underdeveloped, the rolls may not rise properly. Check your yeast to ensure it's still within the expiration date. Don't rush the proving stage, as this is when air develops in the dough, making the rolls light and fluffy. Proving time can be affected by temperature-yeast grows best in a warm environment, such as a hot water cupboard or a slightly warmed (but turned off) oven. The dough should double in size during each proving stage.
Yes, simply replace the milk with water, and use oil instead of butter to brush the tops.
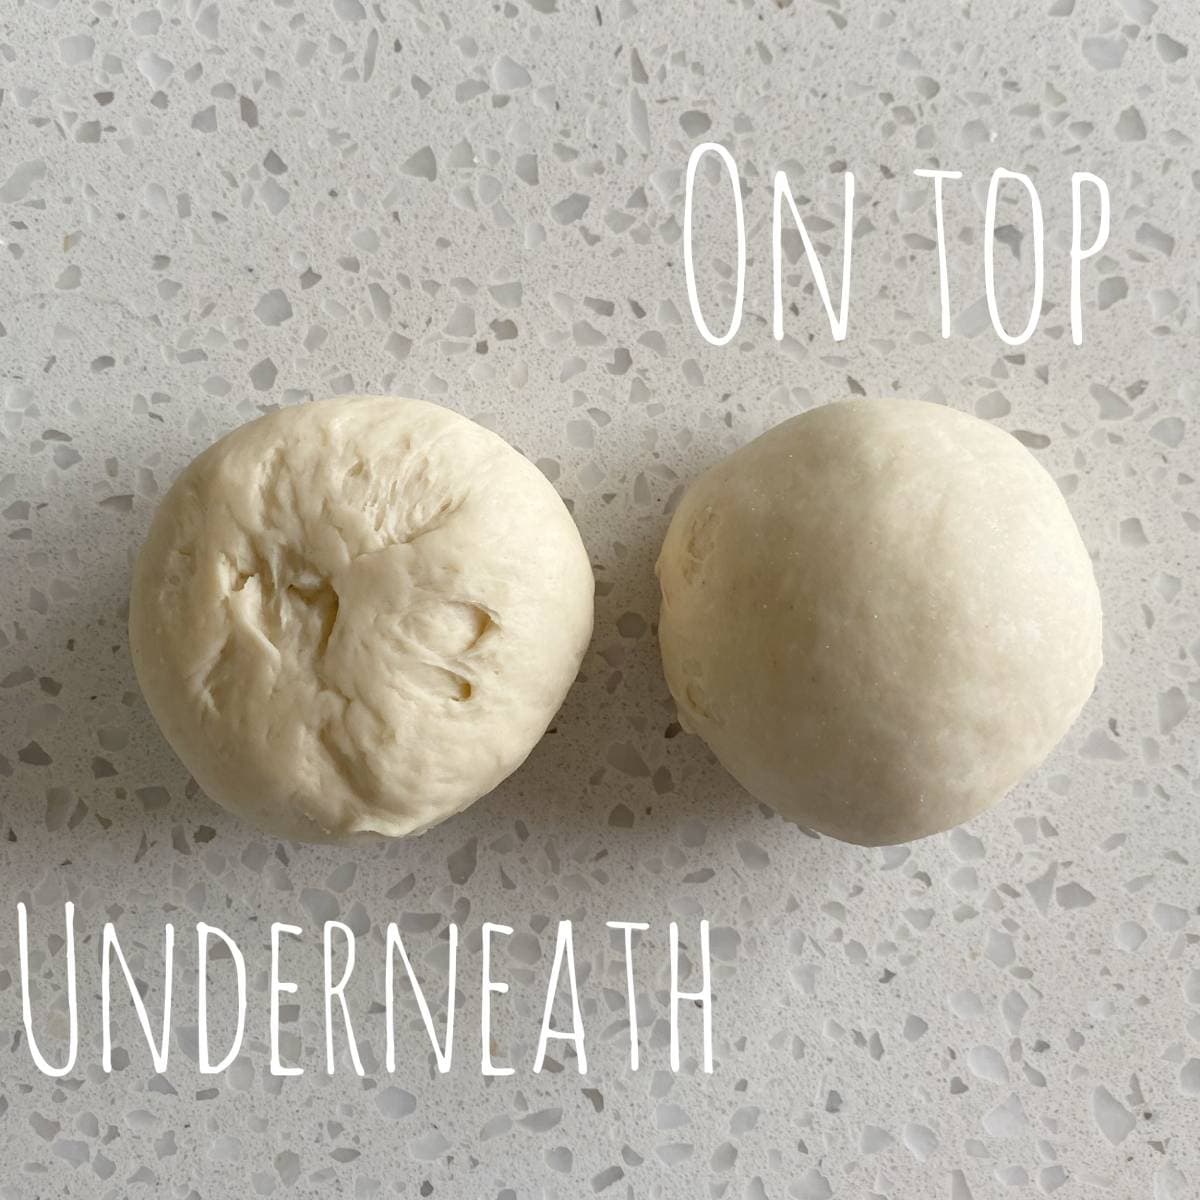
It takes a bit of practice! There are great video tutorials online if you've never done it before. The key is to cup your hand over the ball and roll in circular motions, using the friction of the bench to help create a smooth, tight surface on top. The bottom won't be smooth, but that won't be visible once baked! (see picture below)
Storage:
These rolls are best served fresh on the day they are made. Store in an airtight container or snap lock bag in the pantry.
These rolls are also great for freezing. Once the rolls have cooled completely, palce them in an airtight bag and freeze as soon as possible to lock in the freshness.
Top tips:
- These rolls are about the same size that you buy in the supermarket, if you would like smaller slider size rolls you can divide the dough into 18 or 24. If you want to make smaller ones or just like to be precise, I would recommend using a scale to weigh your dough and then divide by the number of rolls you want so that they are uniform. It's a bit harder to do it by feel when they get smaller. If you don't have a scale, then you can roll the dough out into a long log shape, divide the dough in half and then half again, then into thirds to make 12 rolls
- When rolling your dough into small balls you can flour your hands lightly, but keep the work surface clean. You need to the dough needs to grip to your work surface in order to shape them.
- If your dough seems to wet and sticky you can add a little extra flour, one tablespoon at a time. Don't over do it because adding too much flour can make your rolls a bit more dense.
- To check that they are cooked, you can tap the tops and they should sound hollow.
Related Recipes:

Made this recipe?
Please click on the stars below to rate it or, write a review!
Dinner Rolls
Picture-perfect, soft and fluffy dinner rolls made from pantry staples - sugar, yeast, flour, butter and milk.
Ingredients
- 1 cup milk
- ½ cup warm water
- 1 Tbsp dried yeast
- 1 ½ Tbsp sugar
- 3 tsp vegetable oil
- 1 ½ tsp salt
- 3 ⅔ cups high-grade flour (550g)
- 2 Tbsp melted butter (for brushing)
Instructions
- In a mixing bowl, combine the milk and warm water, it should be lukewarm to the touch. Add the dried yeast and sugar, then stir and let sit for 5 minutes, or until frothy.
- Add the vegetable oil, salt, and flour. Using a stand mixer with a dough hook attachment, mix for 2–3 minutes until the dough forms and pulls away from the sides of the bowl.
- Transfer the dough to a lightly floured surface and knead by hand for up to 5 minutes, until the dough feels smooth and springy. Shape into a tight ball.
- Place the dough in a lightly oiled bowl, cover with plastic wrap, and let it rise in a warm spot for about 1 hour, or until doubled in size.
- Turn the dough out onto a lightly floured surface and divide it into 12 equal portions (you can weigh the dough or eyeball it).
- Shape each portion into a ball and place them on a lined baking tray, about 2 cm apart. Let the dough balls prove in a warm spot for 45 minutes. Preheat the oven to 180°C fan bake.
- Bake for 15 minutes, then brush the tops with melted butter. Continue baking for an additional 3–5 minutes, or until golden brown.
- Serve warm with butter.
Notes
- These rolls are best served fresh on the day they are made. Store in an airtight container or bag in the pantry. If freezing once they have cooled down from baking put them in an airtight bag and freeze as soon as possible to lock in freshness.
Nutrition Information:
Yield: 12 Serving Size: 1Amount Per Serving: Calories: 186Total Fat: 4gSaturated Fat: 2gTrans Fat: 0gUnsaturated Fat: 2gCholesterol: 7mgSodium: 317mgCarbohydrates: 32gFiber: 1gSugar: 3gProtein: 5g
Nutritional values are approximate. Please use your own calculations if you require a special diet.
Thank you for checking out this recipe. I hope you enjoy making and eating it! If you have any questions, queries or feedback, please feel free to leave a comment below.
If you don't already follow me, head over to my Instagram, Facebook or TikTok pages to keep up to date with all my new recipes.
Vanya


Nicole says
Can you make these without a stand mixer? If so, how? Please
VJ cooks says
You could use a hand-held mixer with dough attachments. If you're wanting to mix it by hand, just note it will take a long time and a lot of elbow grease to get it to the right consistency.
Cheree says
I tried your recipe for my first attempt at making dinner roles and they came out perfectly. Thank you
VJ cooks says
I'm so pleased to hear that! Thanks you for the feedback, Cheree.
Steph Roy says
Hi is a stand mixer a must ?
VJ cooks says
A stand mixer with a dough hook is the easiest and fastest way to produce the dough. You could do it by hand, but it will take longer and a lot more effort.
Belinda says
Could I add a seed mix to these?
VJ cooks says
Yes I think that would work, as long as it's not a huge amount!
Sarah says
Can the dough be made in a bread maker on the dough setting?
VJ cooks says
I haven't tried that sorry, let me know how you get on.
Sarah says
I used the bread maker to knead the dough. They were delicious! My family ask for them all the time.
Jess says
Hello. I have a Neville’s bakers oven. Would you put it on the dough setting? Thanks
VJ cooks says
I haven't made these in an appliance sorry.
Sarah says
Hi VJ, any chance we can swap the oil for melted butter? Just checking. Thanks
VJ cooks says
Yes that will be fine!
Diane Cross says
Just bought new yeast still not frothing after 10 minutes, should the milk and water both be Luke warm.
The dough has turned out very heavy
VJ cooks says
Hi Diane, sorry to hear this. Your yeast absolutely should froth up. It sounds like it was either not active to start with (out of date from the shop) or it got killed in the baking process from the liquid being too hot. We will have a look at the recipe and work out a fail proof way to test your yeast before adding it so that your don't end up with yeast that isn't working as it should.
LYNN says
CAN YOU USE OLIVE OIL
VJ cooks says
Yes you can.
Alice says
Can you make this into a loaf? The best rolls!! The family loves them
VJ cooks says
Thanks Alice! I haven't tried it sorry but a few things to consider would include, giving the loaf longer to prove and bake and also that the texture might be different/not as soft and fluffy.
Tan Miller says
The can the dough be prepared and then cooked later? Eg made in morning and cooked in afternoon
VJ cooks says
Yes it could, you'd just have to handle the dough differently. Refrigerate the dough after shaping and proving them the first time so that they have a slow rise. Take them out of the refrigerator with time to warm up and finish proving before baking.