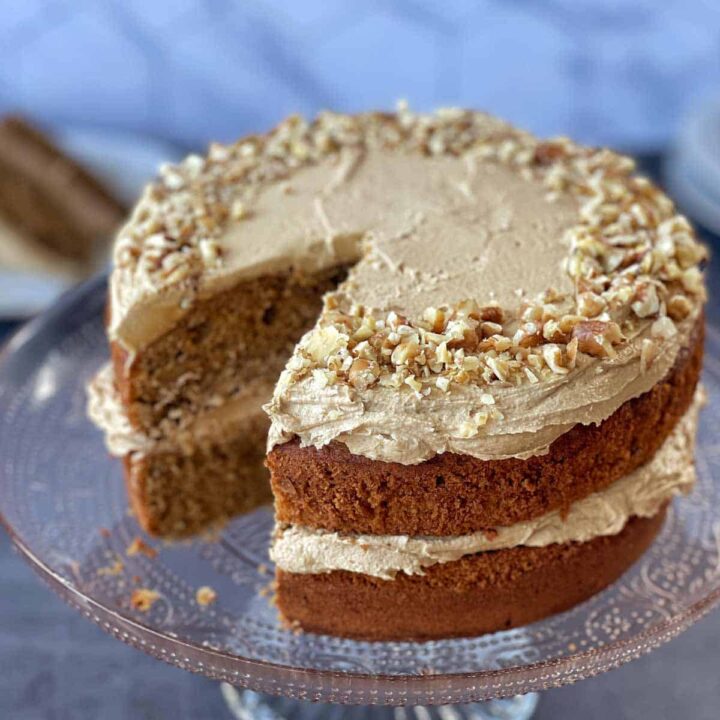
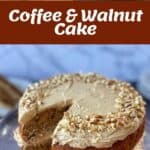
A double-layered coffee and walnut cake filled with coffee buttercream icing, topped with more buttercream icing and chopped walnuts. An excellent cake for a special celebration.

I first made this Coffee and Walnut Cake for my sister. I'd offered to make her birthday cake and she requested this nostalgic number from our childhood. Our mum used to make a similar one however I added some coffee buttercream icing to zhuzh it up a bit. The cake is golden and soft with crunchy pieces of walnut in it. While the buttercream icing is made with brown sugar and coffee giving it a lovely toffee flavour.
For some other great celebration cakes, have a look at our Black Forest Gateau or the Nutella Gateau.
Jump to:
Ingredient notes:

- Flour: This recipe calls for plain flour. I've also made it with gluten free flour and it worked well.
- Coffee: Any brand of instant coffee can be used in this recipe. I used Moccona.
- Walnuts: The combination of coffee and walnuts is tried and true. But if you don't like walnuts, or cant eat them, you can leave them out and just make a coffee cake!
Note: Scroll to the recipe card for the ingredients, quantities and the full method.
Step by step instructions:
Cakes: Preheat the oven to 160°C fan bake. Line 2 x 18cm cake tins with baking paper. Mix the instant coffee and boiling water together in a cup. Set aside to cool. Place the softened butter and brown sugar in the bowl of a stand mixer. Beat until pale and fluffy. Add the eggs one at a time, beating between each addition. Pour the cooled coffee in, mix until just combined.


Add the eggs one at a time, beating between each addition. Pour the cooled coffee in, mix until just combined. Remove the bowl from the stand mixer. Sift in the flour and baking powder, gently fold together.


Add the chopped walnuts and mix to combine. Divide the mixture between the two cake tins. Spread the mixture out the edges with a spatula. Place in the centre of the oven and bake for 25-30 minutes or until golden on top and a cake skewer comes out clean. Remove from the oven and set aside to cool.


Buttercream icing: Mix the instant coffee and boiling water together in a cup. Set aside to cool.
Place the softened butter in the bowl of a stand mixer with the brown sugar. Beat until light and fluffy.


Add the cooled coffee and the icing sugar. Beat for 3-5 minutes until light and creamy.
Assemble: If your cakes have domed, you can cut the top off one to be the base. Place the cut side down on a cake plate, the top with half of the icing, spreading it out to the edges in an even layer.


Place the second cake on top, then top with the remaining icing. Decorate with the extra chopped walnuts.

Recipe FAQs:
Insert a skewer or toothpick into the centre of the cake. If it comes out clean or with a few crumbs, the cake is ready.
Yes, use a good-quality gluten-free flour blend that includes a binder like xanthan gum. The texture may vary slightly, but it still works well. Ensure your other ingredients like baking powder and icing sugar are gluten free.
This can happen if the coffee is too warm or the butter is too cold. Make sure all your ingredients are at room temperature, and beat for a full 3-5 minutes to smooth it out.
Storage:
Keep it in an airtight container at room temperature for up to 3 days, or refrigerate if your kitchen is warm.
The cake layers freeze well - wrap them tightly in cling film and freeze for up to 3 months. The buttercream can also be frozen in an airtight container. Thaw both at room temperature before using.
Tips:
This recipe calls for 2 x 18cm cake tins. If you are using larger tins, the cakes will be flatter and wider but will still taste great. If you are using tins larger than 18cm you might have to reduce the cook time as the mixture will be thinner.

Related Recipes:

Made this recipe?
Please click on the stars below to rate it or, write a review!
Coffee and Walnut Cake
A double-layered coffee and walnut cake filled with coffee buttercream icing and topped with chopped walnuts.
Ingredients
- 2 Tbsp instant coffee
- 2 Tbsp boiling water
- 220g butter, softened
- 220g brown sugar
- 4 eggs
- 1 ½ cups flour
- 1 tsp baking powder
- ¼ cup, finely chopped walnuts
Buttercream icing
- 2 Tbsp instant coffee
- 2 Tbsp boiling water
- 150g butter
- 1 ½ cups icing icing sugar
- ¼ cup brown sugar
- ¼ cup, finely chopped walnuts
Instructions
- Cakes: Preheat the oven to 160°C fan bake. Line 2 x 18cm cake tins with baking paper.
- Mix the instant coffee and boiling water together in a cup. Set aside to cool.
- Place the softened butter and brown sugar in the bowl of a stand mixer. Beat until pale and fluffy.
- Add the eggs one at a time, beating between each addition. Pour the cooled coffee in, mix until just combined.
- Remove the bowl from the stand mixer. Sift in the flour and baking powder, gently fold together. Add the chopped walnuts and mix to combine.
- Divide the mixture between the two cake tins. Spread the mixture out the edges with a spatula.
- Place in the centre of the oven and bake for 25-30 minutes or until golden on top and a cake skewer comes out clean. Remove from the oven and set aside to cool.
- Buttercream icing: Mix the instant coffee and boiling water together in a cup. Set aside to cool.
- Place the softened butter in the bowl of a stand mixer with the brown sugar. Beat until light and fluffy.
- Add the cooled coffee and the icing sugar. Beat for 3-5 minutes until light and creamy.
- Assemble: If your cakes have domed, you can cut the top off one to be the base. Place the cut side down on a cake plate, the top with half of the icing, spreading it out to the edges in an even layer.
- Place the second cake on top, then top with the remaining icing. Decorate with the extra chopped walnuts.
Nutrition Information:
Yield: 16 Serving Size: 1Amount Per Serving: Calories: 465Total Fat: 28gSaturated Fat: 14gTrans Fat: 1gUnsaturated Fat: 12gCholesterol: 96mgSodium: 259mgCarbohydrates: 53gFiber: 1gSugar: 41gProtein: 4g
Nutritional values are approximate. Please use your own calculations if you require a special diet.
Thank you for checking out this recipe. I hope you enjoy making and eating it! If you have any questions, queries or feedback, please feel free to leave a comment below.
If you don't already follow me, head over to my Instagram, Facebook or TikTok pages to keep up to date with all my new recipes.
Vanya
Carolyn says
VJ this looks sooo delicious and I haven't tasted coffee cake for YEARS! so I'm dying to try. This would be nice for a 'girls' afternoon tea
Jude says
Hi VJ Cooks, I love your recipes.
Just a quick question, would coffee made from grounds work for the recipe, or is instant coffee better?
Thank you!
VJ cooks says
That would be fine!
Janet Jin says
I only have one loaf tin and don’t want to buy additional. Can I make one loaf, slice into half and spread buttercream between the two halves?
VJ cooks says
You can, however you will need to cook it longer.
Adam says
My cakes didn’t rise. Maybe 1tsp of baking powder wasn’t enough? I also compared to other recipes and one used 1 table spoon of baking powder and another used self rising flour. Anyways, what a shame and a waste of ingredients.
VJ cooks says
What size tins did you use? This recipe is designed for 18cm / 7 inch tins. Larger tins will give you a flatter wider cake which will still taste great.